

Go to PicMonkey.com (don't worry, it's FREE, and you don't need to sign in or anything!!!) Once there, you'll notice that you can choose to edit a photo or create a collage. Click on "Create a Collage" to begin.
There are four icons on the left-hand side of the screen. Click on the one w/ three boxes of varying sizes. As you mouse over it, you'll notice it's for "layouts."

You'll notice several layouts. Scroll down until you see "FB Cover" and click on it.
Choose the layout that you'd like to see on Facebook -- behind your profile picture.
At this point, you have the option to add one or more photos. Photos are always a great option... but sometimes, I just like to have a splash of color(s) in the "cover photo" spot.

SO TRY THIS:
Click on the "swatches" icon. Currently, you can choose Spring Bling, Winterland, or Sweethearts from the pull-down menu. Use these swatches like photos, dragging them to your "collage." When you're happy with your swatch choices, you can click on the "background" icon to choose things like border spacing and color, or rounded corners. You can also change the size of each swatch-square on your collage. Don't be afraid to play around. You can always undo what you've done.

When you're done, save to your computer's photo file as a .jpg file. Since you started by selecting FB Cover, your collage is already sized correctly for you!
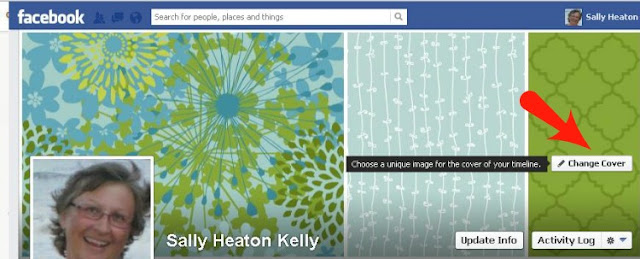
Now, go to facebook. If you move your mouse over to the right-hand side of your cover photo area, you'll notice that the option to "change cover" comes up. Click that, and find the collage photo that you just created and saved to your computer. Once selected and saved, you should see your new cover photo come up.
TaaDaa. You did it! Very nice!

Such a fun cover page!!
ReplyDeleteThanks for the tips!!
Have a blessed and wonderful day!!
Great cover page! Thanks for the information! I've wondered how to do that! Have a great weekend!!~~Angela
ReplyDelete